14 for 14: Building a Navigation Button Bar
By Daniel Wood, 28 May 2015
Previous Navigation Articles and our own Navigation
This is the third navigation article we have done and it has been quite some time between drinks. The first one - Starting out Simple - covers building a basic navigation bar using repeating fields. In the second article - Taking it Further - we extended upon the first by introducing selected screen highlights and a navigation script.
It may surprise you to know that we here at Digital Fusion still use this method for our navigation bar with some small tweaks. Repeating fields are still utilised and have been abstracted to the point the navigation bar setup can be customised per-user and all of the formatting can be done via a combination of styles and editing the repeating field contents. It is robust, works well and highly flexible.
So why consider the button bar?
It's a great question. The button bar on its surface seems to be very similar to our navigation method in regards to how it can be styled to look, and how it functions. Each segment can run a script for navigation, and you have total control over how it looks - sounds like a perfect substitute!
And for most applications it is, but there are some small limitations as we'll get into later.
One of the biggest benefits of the button bar over other methods is that the button bar is simply a layout object without a fixed context. If properly setup, it can be built to be entirely generic and contextless, and therefore able to be copy/pasted across multiple layouts.
The components of a button bar we need to setup
So you've decided you want to use a button bar for your navigation - how do you now make it entirely generic and contextless? If we look at the button bar setup we can identify areas we'll need to abstract:

The first we will cover is the label. Fortunately labels can be defined for a segment based on calculation so that is perfect, we can have a different calculation result for each segment.
Next we need to be able to run a script to carry out the navigation. The script needs to know which segment was pressed by the user in order to carry out the correct navigation. Fortunately we can pass a script parameter that differs for each segment, so that takes care of that.
What about if we wish to highlight the current screen segment the user is on? Fortunately once again we can specify what the active segment is via calculation so all good there.
The last thing is icons. Ahh, now we have a little issue. To this point everything could be abstracted into a calculation, and thus alterable outside of the button bar object, but can we change the icon? The answer at this point is no. If your navigation bar is to use built in button icons, then once you define an icon for a segment that's it. You cannot programmatically alter this icon in the future, meaning if you wanted to change it you would have to copy/paste the button bar across all your layouts again.
No icon? Perfect! The button bar is a great tool for a text based navigation bar.
So how do we abstract?
There are a number of ways in which you can abstract the information needed by the button bar. In our example we are going to build a simple navigation table to store our information. We'll then build a custom function to obtain this information for the button bar to use.
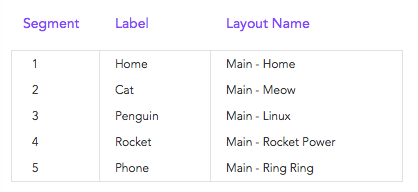
Above we have our navigation table. It has three fields:
- Segment - just a number. It will correlate to a segment of the button bar.
- Label - what we wish the label to be in the button bar
- Layout - what layout will the navigation take the user to when clicked.
And here is our example navigation bar:
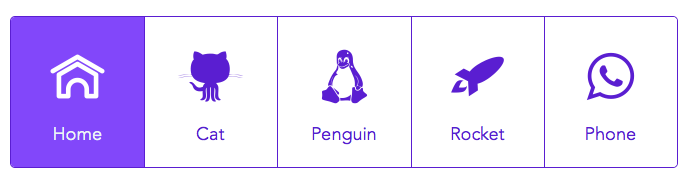
As you can see we have 5 segments. Each label correlates to the segment defined in the navigation table. If we were to for example swap the segment numbers for Penguin and Phone in the navigation table we end up with:

The button bar automatically responds to this change and reorders the Phone and Penguin segments.
Notice anything unusual though? The icons! We cannot have control over these so this type of dynamic reordering of a button bar is prone to problems if you use icons unfortunately :(
Getting the Navigation information to the button bar
It's all fine and well to setup this information in a table but we need to deliver it to the button bar in a way such that the button bar does not have to deal with context.
To achieve this we have built a simple custom function which we call @NAV_GetProperty
This custom function takes two parameters:
- _theNumber: This is a segment number for which you want information.
- _theProperty: This is a keyword that tells the function what information you need.
And that's it. As an example, what if we needed the label for the third segment:
@NAV_GetProperty ( 3 ; "Label" )
The result of this function will be "Phone".
The custom function is used in three situations:
- To define labels - @NAV_GetProperty ( 1 ; "Label" )
- Navigation script to obtain layout - @NAV_GetProperty ( 1 ; "Layout" )
- To determine active segment - @NAV_GetProperty ( "" ; "Active" )
The last situation there is a slightly different case where we do not pass a segment number. In this case the custom function returns a segment number that corresponds to which one should be the active segment.
Using ExecuteSQL to abstract
The custom function is able to return this information, and determine active segment, through the use of the ExecuteSQL function.
For obtaining the layout or label, it simply is carrying out a SELECT query based on the passed segment number, and property. Note: The property corresponds to the field name in the navigation table - so if you decide to change these field names you must also update the custom function accordingly.
Defining what an Active Segment is
In order for us to show an active segment, we must first understand how FileMaker defines what the active segment is for a button bar.
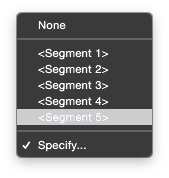
We can either define the active segment explicitly, or via calculation. If defined explicitly we have no control over dynamically altering this, so it is useless for our navigation bar.
What needs to be returned by our calculation in order for the result to be treated as the active segment? The answer is an object name. Each segment can be assigned an object name via the Inspector, and FileMaker compares the calculation result to object names in order to determine active segment.
What are the implications of this? Well first you need to ensure every segment in your button bar has an object name. In our example we have given each the following:
nav_X
where X is a number from 1 to 5, in order.
Active segments are determined by first looking at what layout the user is on. The custom function will perform a SELECT query to obtain the Segment number for the navigation record whose layout matches the current layout. This tells us which segment number our layout is for. We can then simply prefix it with "nav_" to return an object name that corresponds to the button bar active segment.
Putting it all together
We have now a single custom function that we can use to define the active segment and segment labels and layouts.
Our active segment calculation is thus:
@NAV_GetProperty ( "" ; "Active" )
Our label calculation is:
@NAV_GetProperty ( 1 ; "Label" )
and our Navigation script is passed a segment number from which it can obtain the layout:
@NAV_GetProperty ( Get ( ScriptParameter ) ; "Layout" )
Very elegant, very simple, and very flexible!
Taking it further
Because ExecuteSQL is used to obtain navigation information, you can do some pretty cool things with your navigation bar setup.
Perhaps you added a new table called "UserNavigation" which acts as a join table between Navigation, and your Users table. Each record has a user ID and a navigation ID. Basing your navigation bar on this table, you could have different navigation bars for users based on things such as their access privileges, or role. Simply add a record for a user to give them screen access via the button bar.
Another cool feature of the button bar is that text formatting functions will override the styles. You can therefore conditionally format labels to appear disabled if you wish to prevent user access to certain screens as opposed to hiding that screen from the button bar. Using the TextColor function you can achieve this.
Button Bar limitations
We have already covered some limitations around abstracting icons, but there is another property of button bars that may mean they are not suitable to your needs. Each segment of a button bar is the same width as all other segments - you cannot define an individual segments width. This means segments with a long label will wrap its text as opposed to extending the width of the segment:

Sometimes this may not look that bad, but icons will be offset to accommodate.
In conclusion
Button bars are a great FileMaker 14 tool and can be used for a number of applications, one of which may be a navigation bar. As far as making them totally abstracted goes, they work best without icons but if you can live with the icons being fixed to the object then they look great with icons.
Compared to our older articles around navigation bars the button bar comprises of only a single object as opposed to multiple objects for the repeating field implementation. Button bars should also work great in WebDirect and FileMaker Go.
We are strongly looking at whether it is worth making the switch from our repeating field based navigation to button bars. At this point the jury is still out and icon abstraction is a big limitation that will likely see us keep to repeating fields for now.
Example File.
All the screenshots and examples in this article are from our demo file that you can download below. Obviously being a FIleMaker 14 feature this works best in 14, but you can still open it in 13 if you need to.