Popovers that Open and Close on Mouse-Over
By Daniel Wood, 7 July 2014
Introduction
In our last article, we introduced a generic technique that could be used to replicate a mouse-over effect. This used a combination of a custom function, script, plugin and tooltips to allow the user to expand and collapse a sliding drawer control without the need for a mouse-click.
In this article we take the technique and modify it to be suited toward opening and closing the popover object upon mouse-over. Popovers are a new feature in FileMaker 13 and are like a balloon tooltip. They are great for revealing additional information on a layout such as actions, information, checkboxes etc (just like a sliding drawer).
If you have not read the the article on sliding drawers, it is recommended you check it out before reading this article, as we'll assume a knowledge of the technique for this article.
Differences between sliding drawers and popovers
In our sliding drawer article, we only dealt with a single sliding drawer on a single layout. The demo was not built for multi-window, multi-layout, or even multi-panel within the same layout. If a user wished to have two drawers on a given layout, then they would have had to replicate the required functionality for the second drawer, hardly efficient!
Popovers fortunately are a little simpler. FileMaker imposes a restriction on a layout that there can be only one open popover per layout per window. The benefit for us is this makes tracking open/closed popovers much easier - we don't have to know which popovers are open or closed at any given time (because only one can be open) we just need to know which one is open on a given window.
Now, in reality tracking open popovers for multiple windows is a bit overkill for popovers. It would be much more important for sliding drawers however. However we have introduced multi-window support in this articles demo file - the same technique could be back-applied to sliding drawers if need be.
The layout setup is very similar to sliding drawers
Because we are borrowing the same technique from sliding drawers, the layout setup for popovers is very similar.

What you are looking at here is a screenshot of the demo file. There are a few components here:
- A layout object with a tooltip to initiate the popover. In this case it is clippy!
- The actual popover object. We have placed this underneath clippy (more on this later).
- The popover panel which will have a nominated object name (in this case "ClipOne").
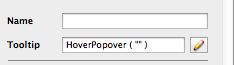
- A large object placed over the layout to close the popover. This will contain a tooltip that calls the HoverPopover custom function, with no parameter passed.
So much like a sliding drawer, our tooltip on Clippy will be used to open the popover, and the layout overlay tooltip is used to close
A little note about the popover panel
There is a little gotcha to beware of here when it comes to the activated popover. Take a look at the picture below:
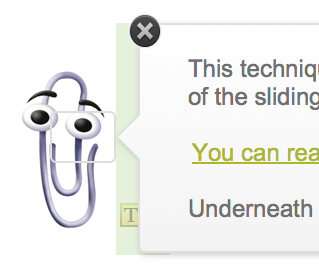
Here we have highlighted in green an area that sits between the popover panel, and the popover button. We shall call this the dead zone. Within this area you are not in the popover - it is just like regular layout space.
This means that in normal circumstances if you were to place your mouse in this area, then the "Close" tooltip would be evaluated and the popover would close.
This is not desirable because after you place your mouse to open the popover, your normal behaviour is to move the mouse toward the popover. If your mouse crosses this zone the popover will immediately close before you get there!
This is why we don't actually use the popover button as the object that contains the initiating tooltip. Instead, we use the clippy object. The clippy image object is large enough that it occupies this green space, so as the user moves the mouse toward the popover, they remain on the clippy object, preventing the popover from closing.
Unfortunately we have no control over the positioning of the popover panel, it is always in the same relative spot to the popover button, and we cannot close this gap.
Changes to the tooltip custom function
As mentioned earlier, we have modified the custom function that is run on tooltips to be more specific toward popovers. The function now also has some multi-window support built in, so lets take a look.
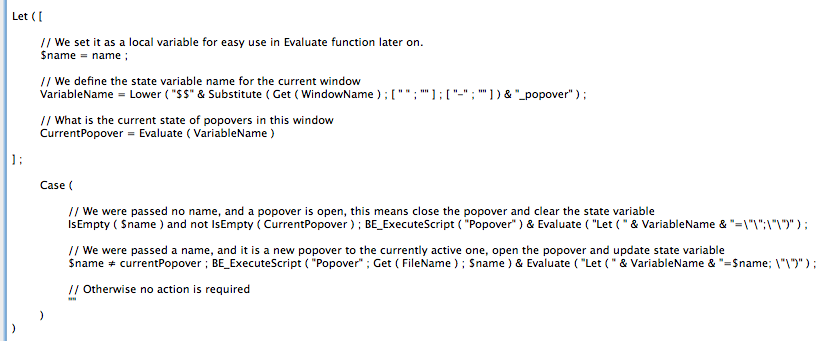
Whereas in the sliding drawer example we used a single variable $$CurrentState to determine the open or closed state of the drawer, here we are going to dynamically generate and clear variables to determine state.
Each variable is defined on a per-window basis. We are using the current windows name as part of the variable name.
VariableName = Lower ( "$$" & Substitute ( Get ( WindowName ) ; [ " " ; "" ] ; [ "-" ; "" ] ) & "_popover" ) ;
Here we establish the global variable name, removing some common illegal characters that may appear in a window name (more work could be done here).
We next immediately evaluate this variable into a Let variable called CurrentPopover which will tell us (if any) what the currently open popover is.
The outcome to the function is one of three scenarios.
When we need to close popovers
This scenario occurs when we are passed a blank popover name to the function. Recall our layout overlay was calling the function with no parameter. The script responsible for closing popovers only has to be run if there is actually an open popover - otherwise we would be running it many hundreds of times unnecessarily. This is why we also check the CurrentPopover variable to determine if any popover is open right now.
BE_ExecuteScript ( "Popover" ) & Evaluate ( "Let ( " & VariableName & "=\\"\\";\\"\\")" ) ;
The above code is what is run in this scenario. It comprises of two parts. The first is our plugin call to execute our script.
The second part is how we are updating our global state variable dynamically. We use the Evaluate function to clear our dynamically named variable.
When we need to open a popover
This second scenario occurs when we are passed a popover name, and it is determined this is not the one that is currently open by way of checking the CurrentPopover variable.
BE_ExecuteScript ( "Popover" ; Get ( FileName ) ; $name ) & Evaluate ( "Let ( " & VariableName & "=$name; \\"\\")" ) ;
In this case, we are again calling the Popover script, but this time we pass a parameter to the script. The parameter we pass is the popover name passed to the script - the one we wish to open.
The second part is similar to what we do when we close popovers, but this time we dynamically set our variable to the newly opened popover name.
When we need to do nothing
If we need to do nothing, then we do nothing ! This occurs when either popovers are closed and the users tooltip is to close popovers, or when a specific popover is open, and the users tooltip is telling the function to open that same tooltip. In both situations there is absolutely no point in running our script - this would just be a hinderance to performance of the system.
The popover script
This script is much simpler than that for the sliding drawer.
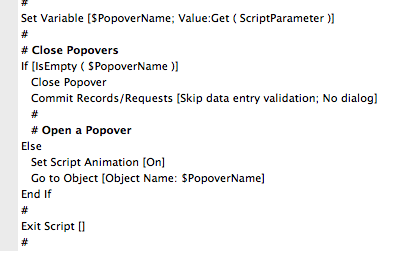
The script is passed a parameter which can either be blank (in which case we close popovers), or it will be the object name of a popover that is to be opened. Depending on the value of the variable, we run the appropriate steps - simple !
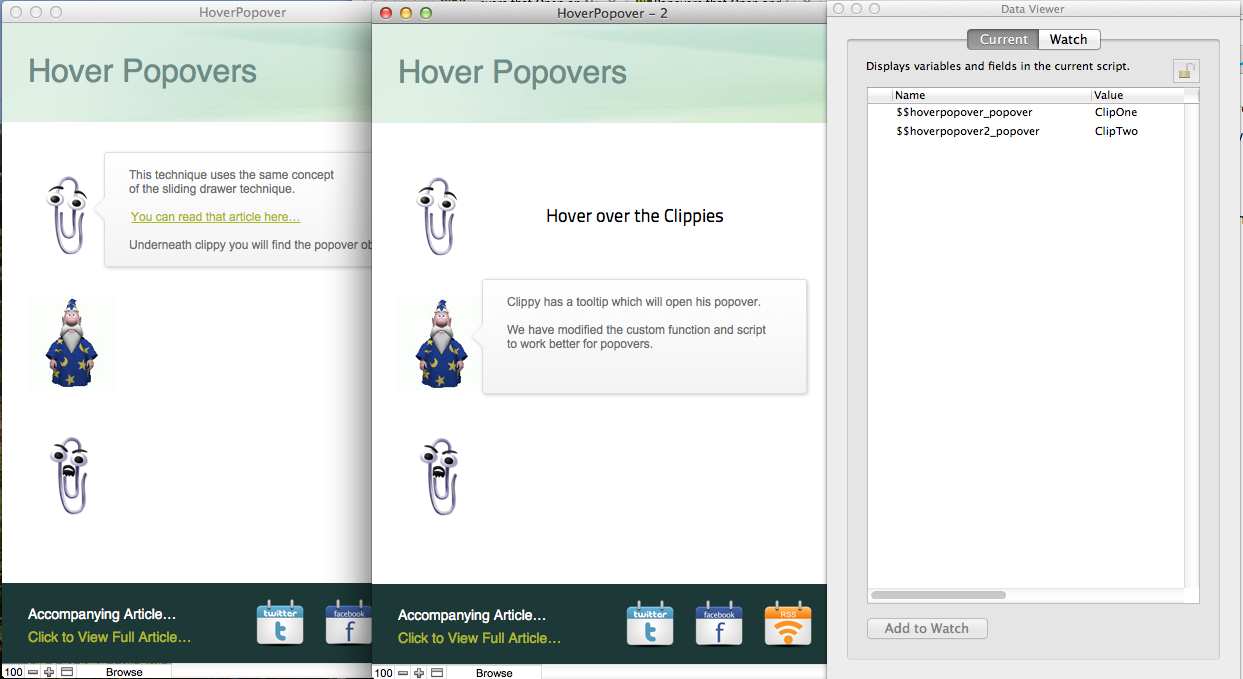
Multi-Window
With the additional of dynamic generation of the global variables to manage popover states, we are able to extend this to work across multiple windows. This is a little hard to test given moving the mouse anywhere off a popover area will close it, but for those users who have FileMaker Pro Advanced, fire up the data viewer and check out the Current tab as you move your mouse around the layout. You'll notice state variables being created & cleared instantly. If you open multiple windows then you'll see different variable names being created and cleared also.
The benefit of multi-window support would be far better suited for sliding drawers than popovers, but hopefully this article gives some ideas as to how the drawer file could be extended to be more powerful.
Some limitations and unresolved issues
The file works pretty reliably but there are a few situations that could arise. They are nothing major and will likely go unnoticed, but they are worth mentioning.
The first is the fact that while our script is responsible for closing popovers via tooltips, the user can still close the popover with a click of their mouse somewhere that isn't on the popover button.
If the user does this, then it will not clear the state global variable, so the system thinks the popover is still open. This isn't a huge deal because as soon as the mouse goes somewhere else on the layout, the variable is reset. Other things such as on-timers may cause popovers to clear without clearing their variable, but again these are minor issues.
Example File
Please find attached an example file. This file is provided to help you fully understand what is going on in this article. Note that FileMaker 13 is required to view this example file. The file also contains both windows and mac versions of the BaseElements plugin from Goya, and has been set to install silently on startup if you do not already have this plugin installed.