Proper Printing in WebDirect [Updated]
By Daniel Wood, 15 August 2014
[Update 26/9/14]
Thank you to some readers who pointed out a few bugs in the example file affecting windows users. The issue was in the "RoboPrint - Process Print Jobs" script. Interestingly, this script runs in the context of a popup window, and we were using a third off-screen window to carry out individual print jobs. When this off-screen window closed, the script focus was actually returned to the main window, not the popup which launched the off-screen window, a bug if ever I saw one! We have modified the example file to explicitly change context back to the RoboPrint popup once processing of print-jobs has been completed. You can download the revised example file at the bottom of this article.
Introduction
For those not familiar with WebDirect think of it as Instant Web Publishing enhanced. Whereas IWP was fairly static, the goal for WebDirect is to be more dynamic and responsive to user interaction. Most FileMaker Pro functionality is there in WebDirect and the overall experience can be made to feel very similar to FileMaker Pro. One of the key features it lacks though is the ability to print reports and this is quite an important feature if WebDirect is to be used as a substitute for FileMaker Pro as a deployment platform.
The implications of no printing in WebDirect
Because the Print script step is unsupported in WebDirect, the only other way to print is through the browsers print function. This however is a very poor substitute as the browser will only print the visible window contents. Any lists of records or any layout that cannot fit entirely in the visible window will not print. Without Preview mode we also have no ability for producing complex sub-summary reports or sliding of records. Basically, it just dun work!
Side note: when we say printing in this article what we really mean is preview mode and all that goes along with that (such as printing).
Okay so it doesn't print, so what can it do?
One thing WebDirect does do quite well is displaying interactive container data. What has that got to do with anything you ask? Well, it means displaying a PDF within WebDirect is pretty nice, so if we could generate a report as a PDF and display that to the WebDirect user instead, then this should allow them to scroll through it, preview it, and subsequently print it via printing of the PDF.

How will we generate a PDF for the WebDirect user?
This is at the heart of the entire framework. Unfortunately FileMaker Server is unable to natively generate a PDF. The only two FileMaker platforms capable of generating a PDF is FileMaker Pro and FileMaker Go. Go is obviously not an option so lets use FileMaker Pro! What we need to do is have a copy of FileMaker Pro responsible for the PDF generation of WebDirect user initiated reports.
This is not an uncommon technique and is something that sometimes is used when reports need to be e-mailed to users on a nightly basis. Because FileMaker Server cannot produce the PDF, we instead call on the help of a Robot copy of FileMaker Pro to do the effort of PDF generation. FileMaker Server can then attach and send the reports via a scheduled script or the copy of FileMaker Pro could just do this itself.
We shall call this copy of FileMaker Pro from this point on RoboPrint !

What is the basic framework outline?
In the framework we refer to the WebDirect user as RoboUser and the robot copy of FileMaker Pro tasked with producing report PDFs as RoboPrint. The basic process of events is as such:
- RoboUser initiates a print job
- RoboPrint is polling for new print jobs and detects the request from RoboUser
- RoboPrint then runs the report on behalf of RoboUser.
- The resulting report is saved as a PDF document onto the print job and marked as done.
- RoboUser now sees their report has been generated and is able to view the PDF.
That is it in a nutshell. Now how this all actually works is a little more in-depth so we'll cover the process in a little more detail below and how this relates to the example framework file.
... For those who just want to get stuck in and see how it works...
Technical jargon and explanations of how it all works are below, but if you want to just fire up the example file and see what it's all about then you will need to do a few things first:
- Example file needs to be hosted on FileMaker Server (because WebDirect is FMS only).
- A copy of FileMaker Pro must be running the database logged in with username RoboPrint (no password), and the RoboPrint procedure must be running by clicking the launch button.
- In WebDirect open the hosted database with username RoboUser. You can then click on any of the 3 report buttons to test.
If all goes well you should see the WebDirect RoboUser wait for the PDF to be generated. In FileMaker Pro you should see RoboPrint retrieve the print job, process it and mark it as done. Then back in WebDirect you'll see the resulting PDF displayed in an interactive container.
You can also test as RoboUser in either FileMaker Pro or FileMaker Go - this does not require WebDirect to test with. If you do not have access to WebDirect then so long as you can access the database (shared) in 2 copies of FileMaker Pro you will be able to test the demo.
Still a work in progress
This framework at this stage is by no means perfect. It was built out of necessity for a large WebDirect deployment and has so far stood up to the test and been a reliable means of generating reports in WebDirect which is why we have turned it into an article :)
There will always be improvements that can be made to the framework and the intention is that others in the community will take the general method and build upon it for others.
Example File
Please find attached an example file. This file is provided to help you fully understand what is going on in the rest of the article below. Note that FileMaker 13 is required to view this example file.
The example file is intended to be a demonstration of a framework. This is not a modular style implementation currently so to use in your own solution you would recreate the functionality found within the file.
Click here to Download the Example File
The geeky stuff on how it works
Still with us?
Good. You have made it through the first part of the article - congratulations! If you are still here then perhaps you have downloaded the example file and had a look and are curious as to the technicalities behind how it works. It's not that complicated really! Below we'll just cover the basics of the framework so you can feel confident if you need to implement into your own solutions or to make any adjustments or improvements.
The idea of a print job
In the framework is the idea of a print job. Because RoboPrint runs in FileMaker Pro, and RoboUser can be on any platform, there needs to be a method of communication between them in order to convey the type of report RoboUser wants to run, and any criteria around running it. We do this by way of a table funnily enough also called RoboPrint (just to confuse you!).
Each record in this table is an individual print job that is generated by a user for example lets say in WebDirect. The record contains a number of fields that will tell RoboPrint all the information it needs to generate the correct report. Most fields are self explanatory (you can check the comments on the fields for more info).
When a WebDirect user runs a report the script that is run will generate one of these records, populate it with the required information, and sit back and wait until the record is marked as either complete or in the event something went wrong marked with an error.
The request initiation script
When the WebDirect user wishes to run a report the generic script they run is called "Robouser - Initiate Print Job".
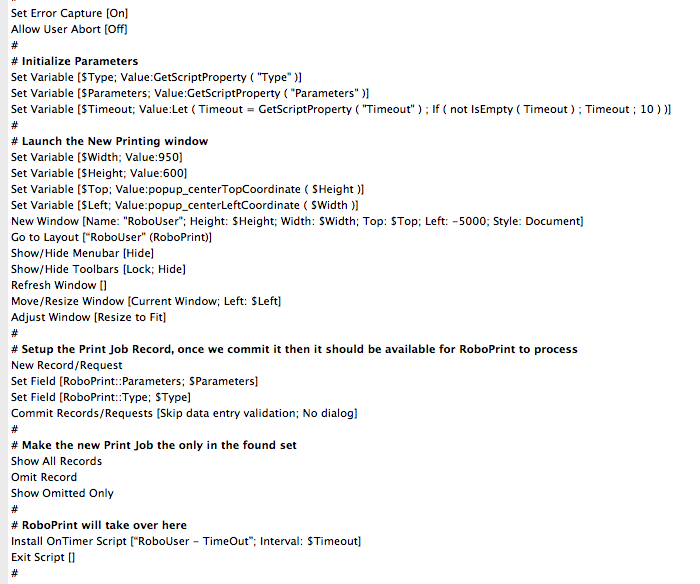
We pass 3 key parameters:
- Type is a keyword that will tell RoboPrint what type of report the user wishes to run
- Parameters is a text string of parameters that may be required to produce the correct report output.
- Timeout - this is a period - in seconds - which will be used for how long the WebDirect user will wait for the report output to be delivered. Default is 30 seconds.
The rest of the script will launch a new virtual web window and go to the RoboUser PDF layout. It creates a print job and then simply sits and waits until the process if finished, or expires.
The nice thing about using a new window is that on WebDirect this acts as a 'virtual' window which from the users perspective looks like they have gone to a different page entirely. We can just use an onTimer at this point for the timeout. The user can also click a "Done" button on this screen which will delete their print request and close the window - taking them back to their original layout.
Custom Functions for parameters
The framework makes use of 4 custom functions for managing multiple script parameters and results. It's not terribly important you know how they work, but it is important to know how to use them for script parameters.
To pass multiple parameters to a script we use the SetProperty function. If you look at the initialisation script above it is taking three named parameters. We would pass these to the script in the following format:

The SetProperty function can be strung together with & to pass multiple named parameters.
In the property called "Parameters" , we can nest further multiple parameters here if need be.
The script uses the GetScriptProperty function to parse out this data. This function is basically a helper function that calls the GetProperty function, but will automatically pass through the Get(ScriptParameter) function, saving us having to do this bit.
Finally, GetResultProperty is exactly the same as GetScriptProperty with the difference that it will automatically pass through Get(ScriptResult), so is useful for parsing multiple script results.
RoboUser has sent a print request, what happens now?
RoboPrint should be initiated and running in a copy of FileMaker Pro. This is where print jobs are dealt with. RoboPrint is launched using the script RoboPrint - Initiate Process.
Again a fairly simple script. It takes one optional parameter called Duration. This tells RoboPrint how many seconds it should wait between checking for new print jobs. The default is 2 seconds.
RoboPrint operates in a popup modal window which is completely locked down. We use a loop where processing occurs after the duration pause. The loop carries on forever until the process is stopped.
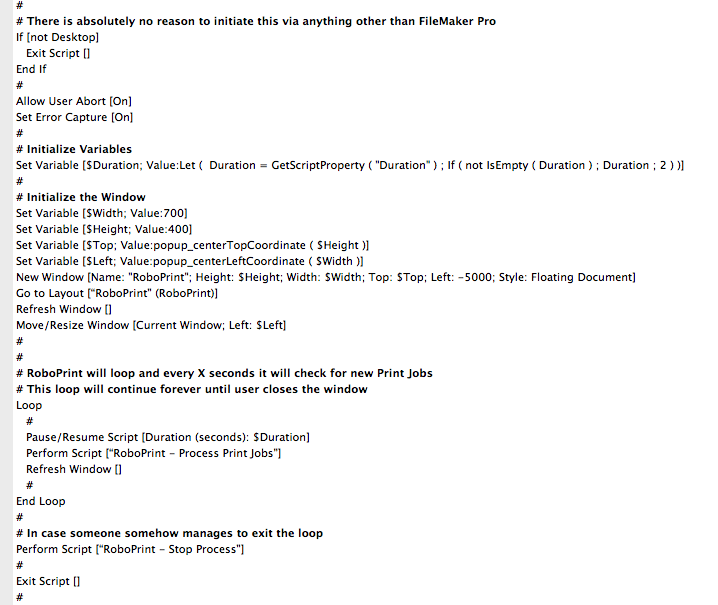
At each check, the script RoboPrint - Process Print Jobs is run.
Processing print jobs
This script is responsible for checking for new print jobs, and for any found making sure the correct report is run. It is also responsible for generation of the resulting PDF, and any tidyup after that.
I won't go and post a big screenshot of the script here, you can check it out for yourself. The following are key points in the process flow of the script:
- It will immediately exit if it finds no new print jobs
- Two windows are utilised in processing of print jobs. First is the main RoboPrint window which controls print job processing. The second is a helper window created off-screen. This special window is where the report itself is generated and the PDF is produced. The reason we use a second off-screen window is one of niceness. It ensures that the main RoboPrint window never changes context, and the dirty work of producing the report never gets seen. The helper window is created and used for all print jobs being processed in this batch.
- RoboPrint must ensure it can get a record lock on a print job record before it will process it. The reason is that it ensures a user may not be in the act of creating or deleting their print job.
- The script will branch off and run a report-specific subscript whose responsibility is to correctly find the report records, set sort order, page setup etc. At this point in the script the $Type variable passed as a parameter is utilised. This is the only part of this script that a developer will need to modify when new reports are added.
- At any point in the process if any errors occur, these are marked on the print job record and that job is then considered processed. The user will see that an error has occurred and the reason for the error. Errors can be at the FileMaker level (eg could not produce PDF) or at the report level (user tried to run an invoice report but no invoices matched their criteria...)
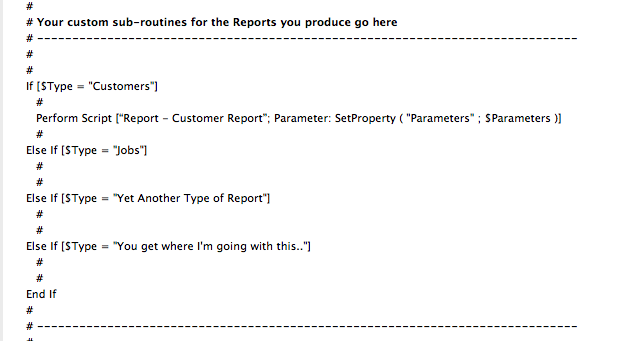
Branching to run report specific subroutines
As mentioned above, there has to come a time in this process where a script is run for the specific reports, as each report is different.
You can see this part of the script pictured below. Each print job is tagged with a type keyword that is set into the local variable at the start of the script. Here is where you check the type and run your appropriate subroutine script, passing through the parameters that script will require.
Drinks Break!

How you should configure your report specific scripts
Okay back to it. There are a few rules that need to be followed when you setup your specific report scripts for use with RoboPrint.
- Make sure there are no script steps that will pause the script, such as custom dialogs.
- Make sure error capture is on - we cannot have any FileMaker dialogs appearing here as RoboPrint ain't gonna dismiss them!
- In the event of an error, or a reason why the user can't run the report (e.g. no records, or no access) you should return a script result using the Setproperty function with the property name "Error". This will be set back onto the print job as an error that the user will be informed of.
Once done, your script just needs to exit without error. You needn't do anything regarding PDF generation, that is handled elsewhere, just finish!
Production of the PDF
The Process Print Jobs script is responsible for calling another sub-script to produce the PDF once the users custom report script has been executed. This script is called "RoboPrint - Produce PDF"
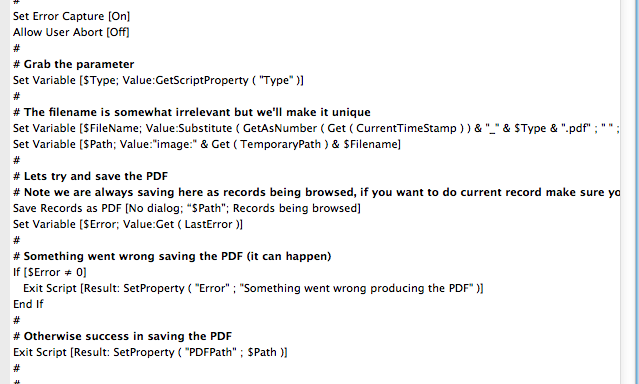
The script again is pretty straightforward. We pass it the type of report simply for the purpose of the PDF filename. By default the PDF filename is a combination of the current timestamp as a number, and the report type. This ensures a good chance of a unique PDF filename for the report. You could change this here to whatever you wish the format to be for your solution.
The script will either return an error if for some reason the PDF could not be saved or the path to that PDF on disk.
Finally...
The process print jobs scripts final task is to take that PDF path and insert the PDF into an interactive container on the print job. Once it does this, the print job is marked as completed, and the script will go onto the next print job if there is one, otherwise it is done.
The user has been waiting a while, what are they up to...
As soon as that PDF is inserted onto the print job, the user will see it magically appear in front of them
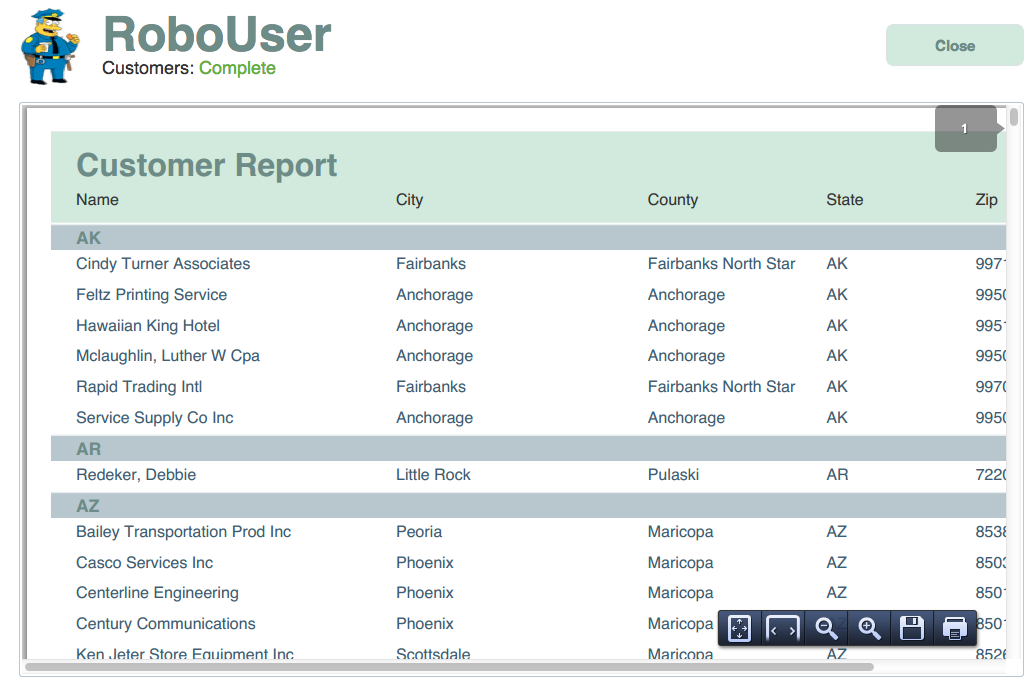
They will be able to scroll through the PDF and depending upon the browser they are using they will se some PDF controls that will let them print, save, zoom etc..
Print job statuses
We show the print jobs status both on the users screen, and in RoboPrint so that at all points of the process the user is kept notified of the status of their request. Statuses include
- Waiting: Print job not yet picked up for processing by RoboPrint.
- In-Progress: RoboPrint has got the lock on the job and is now processing.
- Completed: RoboPrint has finished and put the PDF onto the print job.
- Error: Something went wrong. RoboPrint has put the error message onto the print job.
Some important information on SSL
Certain browsers such as Google Chrome and Firefox have security features that will mean you may notice some unusual behaviour when it comes to the PDF in the interactive content container. These browsers cannot display the content when secure connections to FileMaker Server (SSL) has been turned on within FileMaker Server. The reason is WebDirect will in this case use HTTPS protocol, however external container data will still use HTTP. In the event a secure site has insecure content within it, these browsers will flag it as such and prevent the content from displaying.
What you will see instead is either the icon/filename for the file (which you can actually still right click and export to view) or you will see a link in some cases which you can click to view the PDF.
While not ideal, there are possible ways around this but may involve accepting security dialogs when used first time.
This FileMaker knowledgebase article better documents the issue
Example File
Please find attached an example file. This file is provided to help you fully understand what is going on in the rest of the article above. Note that FileMaker 13 is required to view this example file.
The example file is intended to be a demonstration of a framework. This is not a modular style implementation currently so to use in your own solution you would recreate the functionality found within the file.
Click here to Download the Example File